Tuesday, December 31, 2013

Tree #2 is finished!

Well, I just managed to finish this up at the tail end of 2013.  Overall, I'm pleased with the results.
 
I challenged myself to use more solid fabrics, and fewer prints, than I have in previous work. I like how machine quilting in almost-matching thread looks on the solids.  Here's a closeup:
 
And another:


I tried a facing, rather than binding for the first time.  I used Kathy Loomis's facing tutorial-it was very clear and detailed, but might not be the best technique for very heavily quilted pieces.  I do like the finished result, though, so I will keep experimenting with facing methods.
 
How do you like to finish the edges of quilts?  Have you found a good method for applying a facing? 
Thanks for reading!


Saturday, November 30, 2013

5K- I did it!

Not related to quilting, I know. But, I accomplished a major goal today- I completed a 5K
Here I am crossing the finish line-


And a few seconds later...
My mom and my sister joined me.  My sister has more running experience- she's already done a half-marathon.
 
Here' my mom on the home stretch:
 
This is extra-special because two years ago today she was one-day post-op from a hip replacement.  Go Mom!
We're planning to make this an annual tradition.  Next time I hope to do a little more running and a little less walking :)

Tuesday, November 12, 2013

Why finish one quilt when you can start another?

Designing and starting new projects is my favorite part of quilting, so I tend to have a backlog of unfinished projects (hmm...I guess that is not unusual among quilters, though!)  I'm enjoying Tree #3 so much that I decided to do something very similar for Tree #4. This time I'm experimenting with using some bigger pieces of fabric.  I fussy-cut motifs from some large scale prints to get started.


Here's how it looks after filling in some pieces. 

It's been challenging to use larger pieces, because its harder to blend the colors together smoothly without one piece jumping out and being too obvious.  Also, it is harder to judge the value of a motif from a large print, because they usually have a range of values.  So I'm filling in the areas around big motifs with little snippets to help them blend together.


I did find one spot where the shadow I wanted under a branch was about the same shape as a darker area in a leaf motif I'd cut from an Amy Butler (?) print.
 
See the triangle with the D and the half circle marked DD?  These are areas I plan dark and very dark values (hence the D's, to help me remember). By placing dark values there I will hopefully make it look like a shadow under the tree branch. Well, this leaf shape continued the shapes in the fabric above it, and even though it is not the exact same shape as the shadow I originally planned, I think it works well.
 
To help the large leaf motif blend with the fabrics around it, I trimmed the black off the edges.  Here it is after filling in some more pieces.
 
So for now, Tree #1 is the only one in the series completed.  I'm still quilting Tree #2, need to finish the edge and do a sleeve on Tree #3, and Tree #4 is underway.


Sunday, August 4, 2013

Tree #3 is underway

Early this spring I took many photos of trees.  Big and little, closeup and far away, and lots of different textures of bark.  After looking through these photos, I realized that depicting sunlight and shadow on the trees is what interests me the most. Here is one of my favorite pictures with highlights and shadows:
 
Here is what I came up with.  It's an interpretation of the photo, not an exact replication.


 I used Susan Carlson's technique, explained in her book Serendipity Quilts.  Basically you glue snippets of fabric down, and then quilt over it.  I haven't done the quilting yet, but the gluing was really fun!  Here's a close-up view:
 
 
This is a really fun technique!

Friday, July 12, 2013

Teatime mug rug

As a little break from bigger projects, I whipped up this mug rug.
I paper-pieced the teacup from this free pattern at Piece by Number.  The pattern includes 4 variations; this one is Teacup #2.  I had originally made the block back in October when I did a paper-piecing demo at the Columbus Modern Quilt Guild.  I had planned to use 4 blocks and make a table runner or wall quilt, but the idea of a mug on a mug rug just seemed too perfect. Plus, this block was already done!
 
The quilting is a fun combination of Pebbling and Swirling Water.

And I added some steam coming from the cup.
 
I'm linking up to Free-Motion Friday.  Check it out!
 

Learn to Free Motion Quilt

Come join me for a fun start in Free Motion Quilting.  I will be teaching Intro to FMQ at Sew to Speak in Columbus, Ohio, on August 7 from 6-9 pm. 
 
Here's the class description:
In this fun and relaxed introduction to freemotion quilting, we will de-mystify stippling, a great design to finish any project.  Learn about supplies, including batting, threads, and needles.  Try using some specialty products that make freemotion quilting easier.  Gain confidence in adjusting the tension on your machine and solve common beginner’s problems.  We will have lots of hands-on practice time.  This is a technique class, so you will make practice stitch samples, rather than a completed project.  Free-motion quilting definitely improves with practice.  Let us help you get off on the right foot and make machine quilting fun.   Sewing machine with free-motion foot required (also called darning foot or hopping foot).
If you'd like to join us, contact Sew to Speak to sign up.

Thursday, July 11, 2013

Now I'm on Bloglovin'

<a href="http://www.bloglovin.com/blog/9830733/?claim=3uy99cmbfua">Follow my blog with Bloglovin</a>
So, I've been using Bloglovin' for awhile without realizing my own blog wasn't on there!  Okay, now it is, so you can follow me if you'd like.

Tuesday, July 9, 2013

Teaching a FMQ class

On Sunday I taught beginning Free-Motion Quilting to 5 great friends.  I met this awesome group of ladies through the Columbus Modern Quilt Guild. Since I've been wanting to start teaching, I asked them to join me as my "guinea pigs" to test out the class.  I know it sounds like a cliche, but I think I learned just as much as the students!
Here's Barb quilting away happily.  Check out her blog at Black Squirrel Threads- she is a great writer!  (And a great quilter!)

Look at Abbe's work.  Nice letter-E shapes, Abbe!

And here's Polly and Kathy.  We set out to prove the Free Motion quilting is really all about FUN!


I didn't think to take enough pictures- we were too busy!  So I didn't get a picture of Sheila or her work, but she was very productive! 
Thanks to a super group of quilters for a fun afternoon of stitching.  For anyone interested in teaching quilting, I highly recommend doing a trial-run of your class with some friends. I got great feedback about what areas need more information and what to cut.  I had planned to cover way too much!
And thanks to Kathy for hosting us in her office!

Thursday, July 4, 2013

NQA Show

I had a great time at the NQA show last Friday.  If you have a chance to make it to Columbus for next year's show, I highly recommend it!  I met up with my friend Stacey.  Here she is with her quilt "My Quilting Scrapbook" hanging in the show.
Here's a closeup so you can see the great long-arm quilting on it, done by Michele Mayton.

Last year after NQA, I said to myself, "I need to learn to machine applique!"  This year, I said the same thing.  So I'm really going to do it this time!  I might need to update those quilting goals!

Wednesday, July 3, 2013

WIP Wednesday

I've been working on the FMQ on Tree #2, the wall quilt I'm making for my mother-in-law.
(You can read about the construction here and here). So far, so good!
 I'm applying few lessons learned from quilting Tree #1.  In that project, it was hard to see the quilting because of the busy fabrics, so I used more solids and hand-dyeds with fewer prints this time around. I'm really liking the look of quilting over solids.  Also, I'm trying to match the colors of the threads with the fabrics, to highlight the piecing rather than blurring it together.
 My friend Janet gave me this cute little box of threads- she had gotten it some time ago when she was sewing with her sons' Boy Scout badges, and wanted threads to match.  Not only is the box cute, the blues, greens, and yellows blend beautifully with these fabrics. (The white feathers on the purple fabric have nothing to do with my current project, it just looks better under the threads than my wooden sewing table!)

Check out WIP Wednesday at Freshly Pieced for more inspiration!

Thursday, June 27, 2013

Tutorial: How to quilt Kites

Here's a fun Free-Motion quilting design I first stitched last summer, when I was quilting a baby quilt with a "Kite Star" design.  I'll show you how simple it is to quilt!
 
There's 3 simple parts of the design, and you'll put them all together:
1.  Kite
2.  Tail
3.  Loops
 
Let's see how you quilt it.
Kite:
1. Quilt a diamond.  You'll end up back where you started.
2.  Make a straight line to the tip of the kite.  Sometimes it's tricky to end up at the right spot.  It help me to keep my eyes on the point I'm aiming for, rather than watching the needle as I quilt.
 
Now you've finished the kite and the first part of the design is done!  Next, we'll do the tail.
3.  Make a curvy line away from the kite. Angle back toward the line to form a bow.
4.  Form a triangle, returning to the point where you started the tail. 
 
5.  Now make the other side of the tail, with a mirror-image triangle. You'll finish back at the same point.
 
6. Add as many tails as you like. I usually make 1-3 tails per kite. 
Then, when you are done with the tails, add some loops.  Use the loops to travel as you need through the quilting space, until you are ready for the next kite.
 
 
7. Add a few more loops.
8.  Now continue the design with kites and tails.
 
9.  Here's a fun variation.  Sometimes I think it's hard to quilt straight lines, and curves come more naturally.  If that's the case for you, why fight it?  Your kite can take inspiration from a manta-ray.  Quilt each line as a curve, sloping in toward the center of the kite. 
10. Whether you form the kite with straight lines, or with curves, remember to finish it by quilting a line through the center, ending at the bottom tip of the kite.
 
11. Finish up with tails and loops.
 
Have fun with the easy and free-flowing design! I'm linking up to FMQ Friday- check it out!

Thursday, June 20, 2013

Tree #1 is finished!

I finished up this quilt, which I started about a year and a half ago.  Although I've done a few projects in between, I worked on it pretty steadily, so it feels great to be done!
One thing I learned from making this quilt is how significantly quilting can change the look of piecing.  I made the background of many different pieces, with complicated curved piecing. Then I quilted over it with different colored threads, but I did not pay attention to the piecing lines as I did the quilting, as you can see in these closeups.  This blurred together the piecing.  I think this could be a nice effect in the right quilt, when you want to obscure the lines.  But in this project, I think it is a little disappointing.  Next time I'd like to try to accentuate the piecing, rather than overpower it. I'm really happy with the way the project turned out, and I'm not trying to nit-pick it, just analyze it to see what I can learn for next time.


Another thing I learned was how to make my feathers more flowing and graceful.  They certainly improved over the course of this project! 

The edges of this quilt are really wavy, as you can see!  I did block the finished and quilted top before putting on the binding. I used the method Ann Fahl explains in her book "Threadplay", in which you  hold an iron just above the surface of the quilt and steam it.  I think it helped a lot, but maybe next time I should do it to the top before quilting.  And maybe I will try blocking it by getting it completely wet.
I'm linking up to Off the Wall Fridays and FMQ Friday.

Wednesday, June 19, 2013

FMQ table runner

In a few weeks I'm teaching a free-motion class to some friends.  This will be a great learning experience all around- I will get some feedback on what topics to address and how to pace the class, and hopefully my friends will pick up some helpful tips.

I made samples of the designs we will be working with, and used the Quilt-As-You-Go method to join them into this table runner.
 
 
We will work on stippling,
 
loopy lines
 
and zippling
 
I tried taking these photos out on our balcony, because I thought the natural light would look better.  I'm not sure about the brown lawn chair as a backdrop though- too brown, maybe? 
This was my first try with Quilt-as-You-Go, and I liked it a lot. Leah Day has a great video tutorial on this method.  I'm not sure how often I'll use this technique though, because usually I make wall hangings, that aren't that big anyways, and hard to divide into blocks.  But it's always good to try something new!

Wednesday, June 12, 2013

Tutorial: How to quilt Field of Butterflies

When I was doodling around on the machine, trying to plan the quilting for Tree #2, I came up with this design that I'm calling Field of Butterflies. It uses Cucumber Vine, from the Freemotion Quilting Project, to connect the butterflies.
Here's how to quilt Field of Butterflies:
Step 1.  Begin with a few swirls of Cucumber Vine
Step 2.  Add a short, gently waving line.  Angle away from the work you've already done, into a relatively open area.  This gives you space to form the first butterfly.

Step 3:  Then, add 2 antennae.  This is important- angle the antennae back toward the line you just made.  This leaves the area in front of the needle open for the butterfly. This is the one step that is really different from how we usually do Cucumber Vine, but it is important to give yourself enough room for the next step.

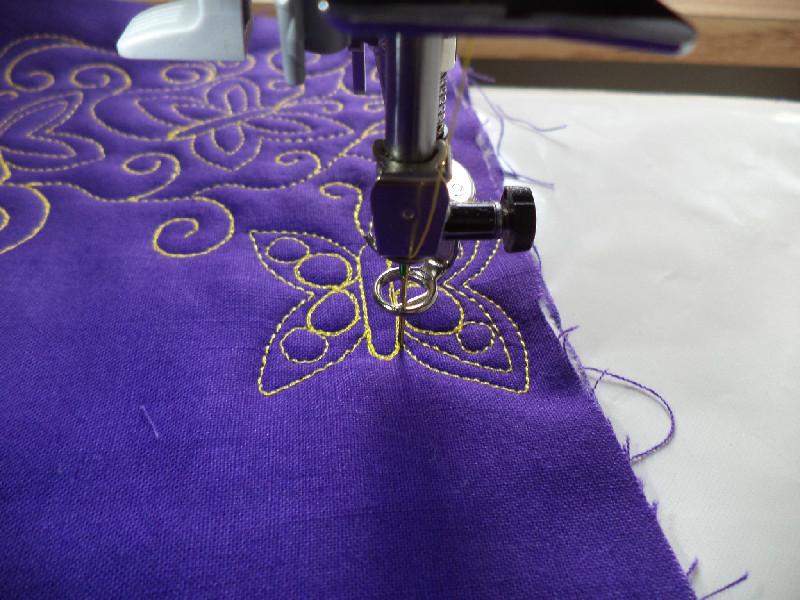
Step 4. Form a long, narrow oval.  This is the butterfly's body.
Step 4.  Make the wings.  Make the top and bottom wing on one side of the body, travel stitch a short distance at the bottom along the oval, then form the wings at the other side of the body.  You will end at the top, or at the "head" of the butterfly.

Step 5: Fill inside the wings.  You can echo inside the existing wing shape, like I did here.
Or, add 2 pebbles to each wing.  I think it looks nice to taper the pebbles, by making a smaller one near the tip of each wing.  Then, I like to echo around the wing.

Step 6:  Use cucumber vine to move through your quilting space. Wherever you ended up in step 5, travel down the butterfly body so that your Cucumber Vine comes out from the bottom of the butterfly, at the opposite end from where you started. This is not really essential, but to me it is easier to evenly cover a space if I consistently end each butterfly at the bottom. 
That's all there is to it!  You are ready to add your next butterfly.  I think this would be a very pretty design on a quilt for a little girl.  Or on a pieced or appliqued butterfly quilt.
This is my first stab at writing a tutorial, so please let me know if you have any questions, or if anything is unclear!
I'm linking up to FMQ Friday.