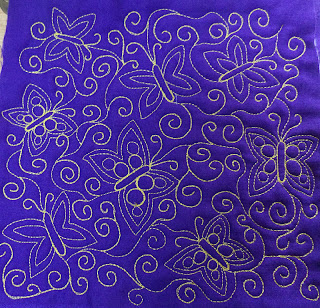
Step 1. Begin with a few swirls of Cucumber Vine
Step 2. Add a short, gently waving line. Angle away from the work you've already done, into a relatively open area. This gives you space to form the first butterfly.
Step 3: Then, add 2 antennae. This is important- angle the antennae back toward the line you just made. This leaves the area in front of the needle open for the butterfly. This is the one step that is really different from how we usually do Cucumber Vine, but it is important to give yourself enough room for the next step.
Or, add 2 pebbles to each wing. I think it looks nice to taper the pebbles, by making a smaller one near the tip of each wing. Then, I like to echo around the wing.
Step 6: Use cucumber vine to move through your quilting space. Wherever you ended up in step 5, travel down the butterfly body so that your Cucumber Vine comes out from the bottom of the butterfly, at the opposite end from where you started. This is not really essential, but to me it is easier to evenly cover a space if I consistently end each butterfly at the bottom.
That's all there is to it! You are ready to add your next butterfly. I think this would be a very pretty design on a quilt for a little girl. Or on a pieced or appliqued butterfly quilt.
This is my first stab at writing a tutorial, so please let me know if you have any questions, or if anything is unclear!
I'm linking up to FMQ Friday.


great tutorial...however..............as always AMAZING, simply amazing free motion quilting! You are so talented.
ReplyDeleteReally pretty, and such a girly colour you have used - it would be perfect for a little girl's quilt.
ReplyDeleteLove from England,
Muv
Beautiful design. Thanks for sharing
ReplyDeleteLove the butterflies, thanks for the great idea!
ReplyDeleteI love this design! So clever and cute!
ReplyDeleteI really like this! Do you remember the Reading Rainbow theme song? Sing the following comment to that tune:
ReplyDeleteButterflies you can stitch,
A design so vibrant and rich.
So forge ahead,
With needle and thread.
This tutorial's a perfect pitch!
I actually did sing this outloud when I read it! Very clever, thank you!
DeleteWOw! What a beautiful pattern! Thanks for this tutorial! :)
ReplyDeleteThat is lovely. Thanks for sharing
ReplyDeleteLove the butterflies- they're adorable!
ReplyDeletegood job on the tutorial-what a neat pattern!
ReplyDeleteYou did a great job on your tutorial. Thank you!
ReplyDeleteI love your design! My favorites are feminine designs and this is adorable. I have to try this!
ReplyDeleteI love this design! Thank you for the step by step photos. The finished piece looks so intricate, but the step by step explanation makes it look like something I could manage (with practice of course!)
ReplyDeleteThanks to everyone for your kind feedback! It really is a fun design to sew, so give it a try! I'd love to see pictures if you quilt it, so feel free to leave a comment with your blog/flickr post, or send me an email!
ReplyDelete