Wednesday, June 19, 2013

FMQ table runner

In a few weeks I'm teaching a free-motion class to some friends.  This will be a great learning experience all around- I will get some feedback on what topics to address and how to pace the class, and hopefully my friends will pick up some helpful tips.

I made samples of the designs we will be working with, and used the Quilt-As-You-Go method to join them into this table runner.
 
 
We will work on stippling,
 
loopy lines
 
and zippling
 
I tried taking these photos out on our balcony, because I thought the natural light would look better.  I'm not sure about the brown lawn chair as a backdrop though- too brown, maybe? 
This was my first try with Quilt-as-You-Go, and I liked it a lot. Leah Day has a great video tutorial on this method.  I'm not sure how often I'll use this technique though, because usually I make wall hangings, that aren't that big anyways, and hard to divide into blocks.  But it's always good to try something new!

Wednesday, June 12, 2013

Tutorial: How to quilt Field of Butterflies

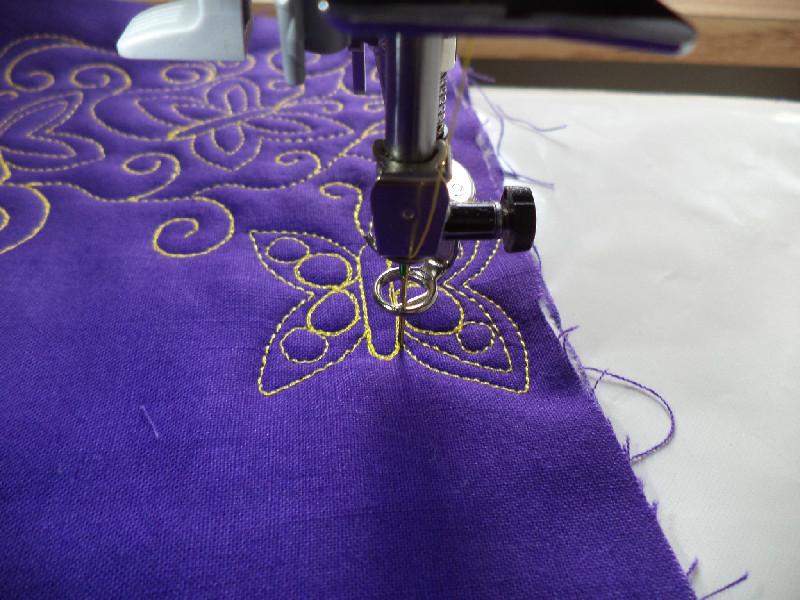
When I was doodling around on the machine, trying to plan the quilting for Tree #2, I came up with this design that I'm calling Field of Butterflies. It uses Cucumber Vine, from the Freemotion Quilting Project, to connect the butterflies.
Here's how to quilt Field of Butterflies:
Step 1.  Begin with a few swirls of Cucumber Vine
Step 2.  Add a short, gently waving line.  Angle away from the work you've already done, into a relatively open area.  This gives you space to form the first butterfly.

Step 3:  Then, add 2 antennae.  This is important- angle the antennae back toward the line you just made.  This leaves the area in front of the needle open for the butterfly. This is the one step that is really different from how we usually do Cucumber Vine, but it is important to give yourself enough room for the next step.

Step 4. Form a long, narrow oval.  This is the butterfly's body.
Step 4.  Make the wings.  Make the top and bottom wing on one side of the body, travel stitch a short distance at the bottom along the oval, then form the wings at the other side of the body.  You will end at the top, or at the "head" of the butterfly.

Step 5: Fill inside the wings.  You can echo inside the existing wing shape, like I did here.
Or, add 2 pebbles to each wing.  I think it looks nice to taper the pebbles, by making a smaller one near the tip of each wing.  Then, I like to echo around the wing.

Step 6:  Use cucumber vine to move through your quilting space. Wherever you ended up in step 5, travel down the butterfly body so that your Cucumber Vine comes out from the bottom of the butterfly, at the opposite end from where you started. This is not really essential, but to me it is easier to evenly cover a space if I consistently end each butterfly at the bottom. 
That's all there is to it!  You are ready to add your next butterfly.  I think this would be a very pretty design on a quilt for a little girl.  Or on a pieced or appliqued butterfly quilt.
This is my first stab at writing a tutorial, so please let me know if you have any questions, or if anything is unclear!
I'm linking up to FMQ Friday.

I quilted it!

I was talking to my mom about my long list of quilting projects for the summer, and when I mentioned quilting this value quilt, she said, "Get it done in a day!"  Well, I got it basted AND quilted in one day- and the power went out during the quilting (okay, only for about 20 minutes).  This is a record for me!

I wanted it to stay soft and cuddly, because this is a quilt to use on the couch.  So I quilted it with an all-over, big scale leaf and loop design. It was hard for me to work on such a big scale and still keep the curves smooth.  It's not perfect, but it stayed soft and didn't stiffen up at all!  (Another first for me!)  This picture makes it look more wrinkly than it really is. 

 On the back I used this fun flannel.  It's "Little Spots" by Michael Miller, and I got it at The Fabric Shack.  What a great store! 
Now it's just waiting for binding.  I'm linking up to WIP Wednesday at Freshly Pieced- check out tons of inspiring projects!

Monday, May 6, 2013

Value Quilt- the top is finished!

I finished piecing my Value quilt top late last week.  Thanks to my husband for posing in these pictures- yes, that's him with the red shoe laces.
It was kind of a windy day for pictures, but I'm not complaining because it was beautiful and sunny.

Here's a closeup, to help me plan the quilting.


Monday, April 29, 2013

Quilts for Boston

The Boston Modern Quilt Guild is asking all modern quilters to come together and donate quilt blocks to help those affected by the recent bombings at the Boston marathon. This is a great opportunity to actually do something to help those hurt by this tragedy.  The members of the BMQG will make the blocks into quilts and distribute them.

Here's my completed block.  Now I just need to get it in the mail to Boston!


It's a fun block, that goes together quickly.  Except that I made a little mistake in trimming the excess fabric.  On one star  point I accidentally cut through the fabric on the front.  See that gray star point in the picture?  Oops!

So, fellow quilters, join me in doing a little something to provide some comfort to those who need it. And check out lots of beautiful blocks in the Flickr group.

Sunday, April 14, 2013

Layouts for the value quilt

I've been re-arranging the pieces of the value quilt, inspired by the beautiful tutorial from SewKatieDid.  Here are 5 possible layouts.
#1 Chevrons


#2 Flying Geese

#3Broken Dishes


#4 Radiating Diamonds


#5 Squares on Point


Which layout is your favorite?

As I've been working on this, I've been listening the "The Hunger Games" audiobook. I had seen the movie before, but since I watched it at a quilt retreat, I missed some major elements.  (I thought Gail and Peeta were the same person). If you aren't familiar with the plot, this doesn't mean much to you, but basically I thought the main character's 2 possible romantic interests were the same person. I'll probably always think of "The Hunger Games" when I see this quilt now!

Any suggestions for great books to listen to while quilting?

I'm linking up to WIP Wednesday at Freshly Pieced.  Check it out!

Wednesday, April 10, 2013

Value quilt

With a (self-imposed) deadline looming, I decided the best way to beat burn-out is to start a new project! I'd really like to finish Tree #1 in time to enter NQA, but recently my desire to finish it has been a little stressful and the project isn't so fun anymore.  So I decided to put it away for a few days.

In the meantime, Katie at SewKatieDid has a fun and easy tutorial for the Value Quilt that I've admired for awhile. I decided this is the perfect fast project to re-invigorate me.

I'm still re-arranging to make the value differences more obvious in some places.  And I need more pieces- I want it to be big enough to be a throw for the living room.  Maybe I'll back it with flannel or Minky to make it nice and snugly.

I like the mix of fresh, modern fabrics with a thrifted shirt, and some old favorites from my stash.


I'm linking up to WIP Wednesday at Freshly Pieced.  Take a look to see tons of inspiring projects in the works!