Showing posts with label tutorial. Show all posts

Thursday, June 27, 2013

Tutorial: How to quilt Kites

Here's a fun Free-Motion quilting design I first stitched last summer, when I was quilting a baby quilt with a "Kite Star" design.  I'll show you how simple it is to quilt!
 
There's 3 simple parts of the design, and you'll put them all together:
1.  Kite
2.  Tail
3.  Loops
 
Let's see how you quilt it.
Kite:
1. Quilt a diamond.  You'll end up back where you started.
2.  Make a straight line to the tip of the kite.  Sometimes it's tricky to end up at the right spot.  It help me to keep my eyes on the point I'm aiming for, rather than watching the needle as I quilt.
 
Now you've finished the kite and the first part of the design is done!  Next, we'll do the tail.
3.  Make a curvy line away from the kite. Angle back toward the line to form a bow.
4.  Form a triangle, returning to the point where you started the tail. 
 
5.  Now make the other side of the tail, with a mirror-image triangle. You'll finish back at the same point.
 
6. Add as many tails as you like. I usually make 1-3 tails per kite. 
Then, when you are done with the tails, add some loops.  Use the loops to travel as you need through the quilting space, until you are ready for the next kite.
 
 
7. Add a few more loops.
8.  Now continue the design with kites and tails.
 
9.  Here's a fun variation.  Sometimes I think it's hard to quilt straight lines, and curves come more naturally.  If that's the case for you, why fight it?  Your kite can take inspiration from a manta-ray.  Quilt each line as a curve, sloping in toward the center of the kite. 
10. Whether you form the kite with straight lines, or with curves, remember to finish it by quilting a line through the center, ending at the bottom tip of the kite.
 
11. Finish up with tails and loops.
 
Have fun with the easy and free-flowing design! I'm linking up to FMQ Friday- check it out!

Wednesday, June 12, 2013

Tutorial: How to quilt Field of Butterflies

When I was doodling around on the machine, trying to plan the quilting for Tree #2, I came up with this design that I'm calling Field of Butterflies. It uses Cucumber Vine, from the Freemotion Quilting Project, to connect the butterflies.
Here's how to quilt Field of Butterflies:
Step 1.  Begin with a few swirls of Cucumber Vine
Step 2.  Add a short, gently waving line.  Angle away from the work you've already done, into a relatively open area.  This gives you space to form the first butterfly.

Step 3:  Then, add 2 antennae.  This is important- angle the antennae back toward the line you just made.  This leaves the area in front of the needle open for the butterfly. This is the one step that is really different from how we usually do Cucumber Vine, but it is important to give yourself enough room for the next step.

Step 4. Form a long, narrow oval.  This is the butterfly's body.
Step 4.  Make the wings.  Make the top and bottom wing on one side of the body, travel stitch a short distance at the bottom along the oval, then form the wings at the other side of the body.  You will end at the top, or at the "head" of the butterfly.

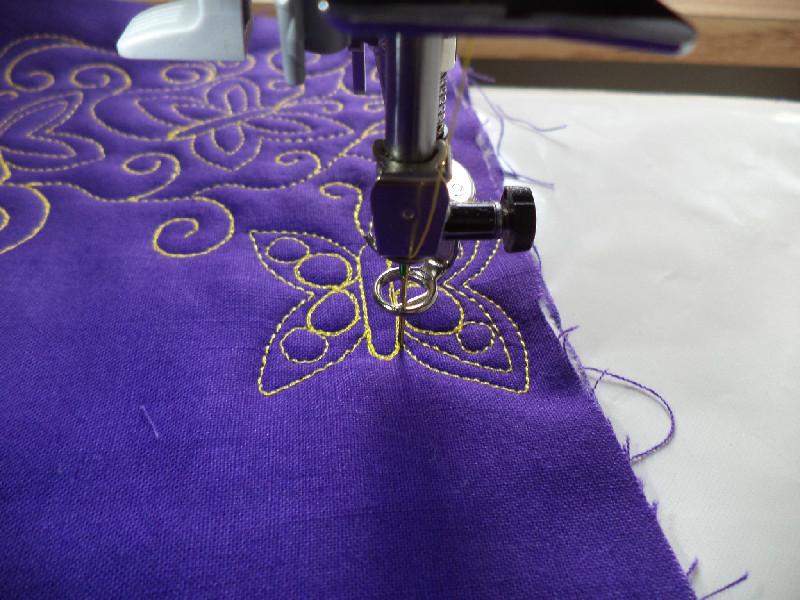
Step 5: Fill inside the wings.  You can echo inside the existing wing shape, like I did here.
Or, add 2 pebbles to each wing.  I think it looks nice to taper the pebbles, by making a smaller one near the tip of each wing.  Then, I like to echo around the wing.

Step 6:  Use cucumber vine to move through your quilting space. Wherever you ended up in step 5, travel down the butterfly body so that your Cucumber Vine comes out from the bottom of the butterfly, at the opposite end from where you started. This is not really essential, but to me it is easier to evenly cover a space if I consistently end each butterfly at the bottom. 
That's all there is to it!  You are ready to add your next butterfly.  I think this would be a very pretty design on a quilt for a little girl.  Or on a pieced or appliqued butterfly quilt.
This is my first stab at writing a tutorial, so please let me know if you have any questions, or if anything is unclear!
I'm linking up to FMQ Friday.